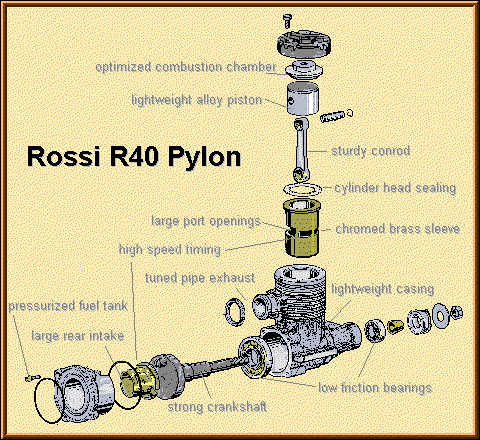
We want to concentrate mainly on the sleeve and it's ports. They are the exhaust port, usually the largest port in the sleeve and allows the burned gases to escape from the engine, the transfer port, usually 2 ports located at 90 degrees to the exhaust port and transfers fresh fuel from the crankcase to the sleeve, and the boost port, 1 or 2 ports located 180 degrees from the exhaust and helps evacuate the exhaust gases and supply fresh fuel.
The first thing you should do with a new engine is take it completely apart and clean any burrs or metal shavings from inside the engine. Pay close attention, take good notes and make sketches as you disassemble the engine. It is real easy, in some cases, to put things like pistons and rotary valves in backwards or upside down. I usually mark the parts with a marker or an awl to identify positions. Remove the sleeve from the case and disassemble the piston and connecting rod. You may need to heat the case in order to remove the sleeve. Use a propane torch or place in the oven at 350 degrees and evenly heat the case until the sleeve can be removed. Wash all parts in warm soapy water with a tooth brush or any other soft bristled brush and dry. If you have an air compressor you can blow the parts dry or use a blow dryer. Spray the front bearings with WD40 (WD stands for Water Displacement) as soon as you have dried the front case assembly to prevent corrosion.
Now we will fit the rotor valve to the backplate. Place the pin into the rotor valve and the backplate. Place a .0015 or .002 feeler gauge or shim stock between the rotor and backplate on one side only and while holding these parts together firmly, tighten the set screw. Lubricate this assembly with WD40 and set aside for final assembly. This process should be performed at a minimum of twice a season and lap if necessary as this fit is critical to good performance. The rotor valve is the heart of the engine.
At this point it is time to take careful and precise measurements of your engine using a micrometer. Measure the distance between connecting rod bearing centers by either measuring between the top of one bearing to the top of the other or measure the distance from inside to inside edge of each bearing and subtract from the outside to outside edge measurement. Measure the piston height from the crown (top) to the center of the wrist pin and from the center of the wrist pin to the skirt (bottom). Measure from crown to skirt and compare measurements for accuracy of the previous measurement. Measure the thickness of the head gasket. Measure the depth of the head from the squishband to the bottom of the head. Measure the head bowl depth and width. Now roll up a piece of paper and place it inside the sleeve. Carefully trace the port openings to the paper making sure that the paper does not move. Mark the top and bottom of the sleeve. Remove the paper and you should have a sketch of the port relationships to use later for timing measurements.
Lap the sleeve to the case so that the sleeve can be easily installed and removed without heating. Use a lapping compound made especially for aluminum or "non-imbedded granet". Again wash with warm soapy water and a soft brush at least three times and dry. Reassemble the engine with the exception of the head and head gasket using a torque screw driver if available. If not be careful not to overtighten the screws. 12 in-lb of torque is all you need for most all engines and that isn't very much compared to what you can exert with a 5 inch screw or allen driver. Use your notes you made previously to make sure you reassemble the engine correctly. After reassembly turn the crankshaft slowly and feel for rough spots or sticking. If this occurs dissassemble, clean, lubricate, reassemble and test again until there are no rough spots or sticking. Even new bearings may need to be replaced.
| Screw Size | Torque (in.-lb) |
| 2mm | 5-7 |
| 2-56 | 6-8 |
| 2.5mm | 8-10 |
| 4-40 | 10-12 |
| 5-40 | 11-13 |
| 3mm | 12-14 |
| 6-32 | 15-17 |
| 4mm | 18-21 |
| 8-32 | 19-23 |
| 5mm | 20-24 |
| 10-32 | 22-26 |
| 1/4-32 Glow Plug | 18-20 |
These are the measurements you want to make:

   Top of sleeve (TOS) to top of piston (TOP) at top dead center (TDC)
   TOS to TOP at bottom dead center (BDC)
   TOS to top of transfer port
   TOS to bottom of transfer port or BDC ***
   Height of transfer port
   Width of transfer port
   TOS to top of boost port
   TOS to bottom of boost port or BDC  ***
   Height of boost port
   Width of boost port
   TOS to top of exhaust port
   TOS to bottom of exhaust port or BDC ***
   Height of exhaust port
   Width of exhaust port
*** Note: The bottom of these ports measured against the piston top may or may not be at BDC. It is highly unlikely that they are above the piston top, but they may be below BDC in which case you write down BDC measurement.

Turn the crankshaft in the counterclockwise direction until the rotor valve just starts to open and measure from TOS to TOP. Turn crankshaft clockwise until rotor valve is just closed and measure TOS to TOP. Install the head and gasket and torque it down.
Congratulations!!! You have just performed the first steps in knowing your engine from the inside. Now go have some fun and break it in !!!!!!! Run at least 3 tanks of fuel through it running on the rich side with 25% nitro fuel. Then use the fuel you plan on using for at least another 2 tanks full.
Send Feedback to
![]()
steve.stevens.bbq@gmail.com
![]()